Showing posts with label Slide Show. Show all posts

5 Feb 2013

Attractive Css3 Cycling Slideshow For Blogger


Today, im  gonna  explain   How  to  add attractive Cycling slideshow for   blogger.Its   included back loading bar for every image.So  it will  make  your blog attractive.You can change your image link as your link. make sure  you  have to use some  pixel images.Try to add to your blog. its easy. Get my  earlier slideshow post here



1. Log in to blogger account and Click drop down.


2. Now select "Template" Like Below.


3. Now you can see Live on blog, Click EDIT HTML Button"

4. Now click Proceed button.
   
5. Find this tag by using Ctrl+F    ]]></b:skin>

6. Paste below code Before ]]></b:skin> tag

 /* fade slider www.bloggertrix.com*/
.content h1 {
 font-size:48px;
 color:#000;
 text-shadow:0px 1px 1px #f4f4f4;
 text-align:center;
 padding:60px 0 30px;
}

/* LAYOUT */
.container {
 margin:0 auto;
 overflow:hidden;
 width:960px;
}

/* CONTENT SLIDER */
#content-slider {
 width:100%;
 height:360px;
 margin:10px auto 0;
}
/* SLIDER */
#slider {
 background:#000;
 border:5px solid #eaeaea;
 box-shadow:1px 1px 5px rgba(0,0,0,0.7);
 height:320px;
 width:680px;
 margin:40px auto 0;
 overflow:visible;
 position:relative;
}
#mask {
 overflow:hidden;
 height:320px;
}
#slider ul {
 margin:0;
 padding:0;
 position:relative;
}
#slider li {
 width:680px;
 height:320px;
 position:absolute;
 top:-325px;
 list-style:none;
}

#slider li.firstanimation {
 -moz-animation:cycle 25s linear infinite;
 -webkit-animation:cycle 25s linear infinite;
}
#slider li.secondanimation {
 -moz-animation:cycletwo 25s linear infinite;
 -webkit-animation:cycletwo 25s linear infinite;
}
#slider li.thirdanimation {
 -moz-animation:cyclethree 25s linear infinite;
 -webkit-animation:cyclethree 25s linear infinite;
}
#slider li.fourthanimation {
 -moz-animation:cyclefour 25s linear infinite;
 -webkit-animation:cyclefour 25s linear infinite;
}
#slider li.fifthanimation {
 -moz-animation:cyclefive 25s linear infinite;
 -webkit-animation:cyclefive 25s linear infinite;
}

#slider .tooltip {
 background:rgba(0,0,0,0.7);
 width:300px;
 height:60px;
 position:relative;
 bottom:75px;
 left:-320px;
 -moz-transition:all 0.3s ease-in-out;
 -webkit-transition:all 0.3s ease-in-out;
}
#slider .tooltip h1 {
 color:#fff;
 font-size:24px;
 font-weight:300;
 line-height:60px;
 padding:0 0 0 20px;
}
#slider li#first:hover .tooltip,
#slider li#second:hover .tooltip,
#slider li#third:hover .tooltip,
#slider li#fourth:hover .tooltip,
#slider li#fifth:hover .tooltip {
 left:0px;
}
#slider:hover li,
#slider:hover .progress-bar {
 -moz-animation-play-state:paused;
 -webkit-animation-play-state:paused;
}

/* PROGRESS BAR */
.progress-bar {
 position:relative;
 top:-5px;
 width:680px;
 height:5px;
 background:#000;
 -moz-animation:fullexpand 25s ease-out infinite;
 -webkit-animation:fullexpand 25s ease-out infinite;
}

/* ANIMATION */
@-moz-keyframes cycle {
 0%  { top:0px; }
 4%  { top:0px; }
 16% { top:0px; opacity:1; z-index:0; }
 20% { top:325px; opacity:0; z-index:0; }
 21% { top:-325px; opacity:0; z-index:-1; }
 92% { top:-325px; opacity:0; z-index:0; }
 96% { top:-325px; opacity:0; }
 100%{ top:0px; opacity:1; }

}
@-moz-keyframes cycletwo {
 0%  { top:-325px; opacity:0; }
 16% { top:-325px; opacity:0; }
 20% { top:0px; opacity:1; }
 24% { top:0px; opacity:1; }
 36% { top:0px; opacity:1; z-index:0; }
 40% { top:325px; opacity:0; z-index:0; }
 41% { top:-325px; opacity:0; z-index:-1; }
 100%{ top:-325px; opacity:0; z-index:-1; }
}
@-moz-keyframes cyclethree {
 0%  { top:-325px; opacity:0; }
 36% { top:-325px; opacity:0; }
 40% { top:0px; opacity:1; }
 44% { top:0px; opacity:1; }
 56% { top:0px; opacity:1; }
 60% { top:325px; opacity:0; z-index:0; }
 61% { top:-325px; opacity:0; z-index:-1; }
 100%{ top:-325px; opacity:0; z-index:-1; }
}
@-moz-keyframes cyclefour {
 0%  { top:-325px; opacity:0; }
 56% { top:-325px; opacity:0; }
 60% { top:0px; opacity:1; }
 64% { top:0px; opacity:1; }
 76% { top:0px; opacity:1; z-index:0; }
 80% { top:325px; opacity:0; z-index:0; }
 81% { top:-325px; opacity:0; z-index:-1; }
 100%{ top:-325px; opacity:0; z-index:-1; }
}
@-moz-keyframes cyclefive {
 0%  { top:-325px; opacity:0; }
 76% { top:-325px; opacity:0; }
 80% { top:0px; opacity:1; }
 84% { top:0px; opacity:1; }
 96% { top:0px; opacity:1; z-index:0; }
 100%{ top:325px; opacity:0; z-index:0; }
}

@-webkit-keyframes cycle {
 0%  { top:0px; }
 4%  { top:0px; }
 16% { top:0px; opacity:1; z-index:0; }
 20% { top:325px; opacity:0; z-index:0; }
 21% { top:-325px; opacity:0; z-index:-1; }
 50% { top:-325px; opacity:0; z-index:-1; }
 92% { top:-325px; opacity:0; z-index:0; }
 96% { top:-325px; opacity:0; }
 100%{ top:0px; opacity:1; }

}
@-webkit-keyframes cycletwo {
 0%  { top:-325px; opacity:0; }
 16% { top:-325px; opacity:0; }
 20% { top:0px; opacity:1; }
 24% { top:0px; opacity:1; }
 36% { top:0px; opacity:1; z-index:0; }
 40% { top:325px; opacity:0; z-index:0; }
 41% { top:-325px; opacity:0; z-index:-1; }
 100%{ top:-325px; opacity:0; z-index:-1; }
}
@-webkit-keyframes cyclethree {
 0%  { top:-325px; opacity:0; }
 36% { top:-325px; opacity:0; }
 40% { top:0px; opacity:1; }
 44% { top:0px; opacity:1; }
 56% { top:0px; opacity:1; z-index:0; }
 60% { top:325px; opacity:0; z-index:0; }
 61% { top:-325px; opacity:0; z-index:-1; }
 100%{ top:-325px; opacity:0; z-index:-1; }
}
@-webkit-keyframes cyclefour {
 0%  { top:-325px; opacity:0; }
 56% { top:-325px; opacity:0; }
 60% { top:0px; opacity:1; }
 64% { top:0px; opacity:1; }
 76% { top:0px; opacity:1; z-index:0; }
 80% { top:325px; opacity:0; z-index:0; }
 81% { top:-325px; opacity:0; z-index:-1; }
 100%{ top:-325px; opacity:0; z-index:-1; }
}
@-webkit-keyframes cyclefive {
 0%  { top:-325px; opacity:0; }
 76% { top:-325px; opacity:0; }
 80% { top:0px; opacity:1; }
 84% { top:0px; opacity:1; }
 96% { top:0px; opacity:1; z-index:0; }
 100%{ top:325px; opacity:0; z-index:0; }
}

/* ANIMATION BAR */
@-moz-keyframes fullexpand {
    0%, 20%, 40%, 60%, 80%, 100% { width:0%; opacity:0; }
    4%, 24%, 44%, 64%, 84% { width:0%; opacity:0.3; }
   16%, 36%, 56%, 76%, 96% { width:100%; opacity:0.7; }
   17%, 37%, 57%, 77%, 97% { width:100%; opacity:0.3; }
   18%, 38%, 58%, 78%, 98% { width:100%; opacity:0; }
}
@-webkit-keyframes fullexpand {
    0%, 20%, 40%, 60%, 80%, 100% { width:0%; opacity:0; }
    4%, 24%, 44%, 64%, 84% { width:0%; opacity:0.3; }
   16%, 36%, 56%, 76%, 96% { width:100%; opacity:0.7; }
   17%, 37%, 57%, 77%, 97% { width:100%; opacity:0.3; }
   18%, 38%, 58%, 78%, 98% { width:100%; opacity:0; }
}

7. Go to blogger and click Layout

8. Click Add Gadget and select 'HTML/Javascript

9. Paste below code.

<div class="container">
 <div id="content-slider">
     <div id="slider">
         <div id="mask">
            <ul>
            <li id="first" class="firstanimation">
            <a href="#">
             <img src="https://blogger.googleusercontent.com/img/b/R29vZ2xl/AVvXsEgzFPzwAvVCC-7Zd_RdEaz05mYkCowF-IV_DF2ZUjIYHHDZGQk_xvP0C21XiestyTVt4jIQ-MsC8f4eDwPpy9bb9Fq2wmYcPHvFIlX5ffIlfxLK6jj6Cd-1biSK3rqpHeTU3WSuSw28lceg/s1600/green.jpg" alt="Green"/>
            </a>
            <div class="tooltip">
            <h1>Green</h1>
            </div>
            </li>

            <li id="second" class="secondanimation">
            <a href="#">
            <img src="https://blogger.googleusercontent.com/img/b/R29vZ2xl/AVvXsEgv-FuwumvtnnjNKnvEV315AI6JV4yhKgQArL8WtxazNv8W11xG7DwdeHdnnEIWBlFWX0SaFkeTPpGyfEpxznv0gkFSK_MPBna2n0N3772-7i3YVdTB8fb4W7462hRIV-4VM0XtGSl-cZ9K/s1600/wallpapers-1.jpg" alt="Car"/>
            </a>
            <div class="tooltip">
            <h1>Car</h1>
            </div>
            </li>
           
            <li id="third" class="thirdanimation">
            <a href="#">
            <img src="https://blogger.googleusercontent.com/img/b/R29vZ2xl/AVvXsEg2AOzHA-Rs8c09fjezwNEoKkjP95WbcLvrWVFpxqK8yyqhVdF5Th3NTXrD-Lm_2roXB12sZj5eTMRsnuj26iaD-cHVnLAt1jTIurUWQjpIK7F4fqF_-CRLzSXyszEQkp43EF09NUBomprO/s1600/nature2.jpg" alt="Nature"/>
            </a>
            <div class="tooltip">
            <h1>Nature</h1>
            </div>
            </li>
                       
            <li id="fourth" class="fourthanimation">
            <a href="#">
             <img src="https://blogger.googleusercontent.com/img/b/R29vZ2xl/AVvXsEh0bGAqir8-a6uzhhytxkuYvhkwrYQbAAczBtXBZf-caewl2MD2fSoNejqKQ2lJA5glyCgGrAqrmyVzL9OZM1041wep9iHjhzirv2tgzEHVhAvfdLIg5AmwjY_0XrHwnzZd754cxAHL451o/s1600/nature.jpg" alt="Nature"/>
            </a>
            <div class="tooltip">
            <h1>Nsture</h1>
            </div>
            </li>
                       
            <li id="fifth" class="fifthanimation">
            <a href="#">
            <img src="https://blogger.googleusercontent.com/img/b/R29vZ2xl/AVvXsEj8nAcckGkRlN6MAK1CQ8WZcZR0dW1YkgMVDT4NWop7SGJ7duuBEbaOuekuX6nXas31Pv_cPpjjddcRXqEqIDTq2vtwDinAWrTF9_giwy_ICNSe77xoR4n2_S9HpV2Wk20Ufh3tNshOezqR/s1600/nature3.jpg" alt="Yellow"/>
            </a>
            <div class="tooltip">
            <h1>Yellow</h1>
            </div>
            </li>
            </ul>
            </div>
            <div class="progress-bar"></div>
        </div>
    </div>
</div>

Replace image links.

10. Now save your HTML/Javascript'.

    You are done.

23 Sept 2012

How To Create JQuery Featured Content Slideshow


Instructions To Follow:

STEP #1
Log in to Blogger, go to Layout -> Edit HTML
and mark the tick box "Expand Widget Templates"

STEP #2
Now find (CTRL+F) this code in the template:
</head>
And immediately before it, paste this code:


<script src='http://ajax.googleapis.com/ajax/libs/jquery/1.4.2/jquery.min.js' type='text/javascript'></script> <script type='text/javascript'> //<![CDATA[ $(document).ready(function() { //Execute the slideShow, set 6 seconds for each images slideShow(3000); }); function slideShow(speed) { //append a LI item to the UL list for displaying caption $('ul.slideshow').append('<li id="slideshow-caption" class="caption"><div class="slideshow-caption-container"><h3></h3><p></p></div></li>'); //Set the opacity of all images to 0 $('ul.slideshow li').css({opacity: 0.0}); //Get the first image and display it (set it to full opacity) $('ul.slideshow li:first').css({opacity: 1.0}); //Get the caption of the first image from REL attribute and display it $('#slideshow-caption h3').html($('ul.slideshow a:first').find('img').attr('title')); $('#slideshow-caption p').html($('ul.slideshow a:first').find('img').attr('alt')); //Display the caption $('#slideshow-caption').css({opacity: 0.7, bottom:0}); //Call the gallery function to run the slideshow var timer = setInterval('gallery()',speed); //pause the slideshow on mouse over $('ul.slideshow').hover( function () { clearInterval(timer); }, function () { timer = setInterval('gallery()',speed); } ); } function gallery() { //if no IMGs have the show class, grab the first image var current = ($('ul.slideshow li.show')? $('ul.slideshow li.show') : $('#ul.slideshow li:first')); //Get next image, if it reached the end of the slideshow, rotate it back to the first image var next = ((current.next().length) ? ((current.next().attr('id') == 'slideshow-caption')? $('ul.slideshow li:first') :current.next()) : $('ul.slideshow li:first')); //Get next image caption var title = next.find('img').attr('title'); var desc = next.find('img').attr('alt'); //Set the fade in effect for the next image, show class has higher z-index next.css({opacity: 0.0}).addClass('show').animate({opacity: 1.0}, 1000); //Hide the caption first, and then set and display the caption $('#slideshow-caption').animate({bottom:-70}, 300, function () { //Display the content $('#slideshow-caption h3').html(title); $('#slideshow-caption p').html(desc); $('#slideshow-caption').animate({bottom:0}, 500); }); //Hide the current image current.animate({opacity: 0.0}, 1000).removeClass('show'); } //]]> </script> <style type="text/css"> ul.slideshow { list-style:none; width:600px; height:240px; overflow:hidden; position:relative; margin:0; padding:0; font-family:Arial,Helvetica,Trebuchet MS,Verdana; ; } ul.slideshow li { position:absolute; left:0; right:0; } ul.slideshow li.show { z-index:500; } ul img { width:600px; height:240px; border:none; } #slideshow-caption { width:600px; height:70px; position:absolute; bottom:0; left:0; color:#fff; background:#000; z-index:500; } #slideshow-caption .slideshow-caption-container { padding:5px 10px; z-index:1000; } #slideshow-caption h3 { margin:0; padding:0; font-size:16px; } #slideshow-caption p { margin:5px 0 0 0; padding:0; } </style>


Now click Save Template


STEP #3 Log in to Blogger, go to Layout


page-elements

Add a Gadget of HTML/JavaScript type. 


image
Then add this code in to it:.


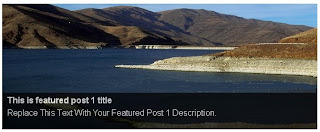
<ul class="slideshow"> <li><a href="#"><img src="https://blogger.googleusercontent.com/img/b/R29vZ2xl/AVvXsEhahz2xakdpakNA4GI13BA4X3ArYUZXUymgzHRWiNP-9oacZ0QHJeZw7qsazDJBNPSO8ubfoZlWu6Zp5PFtrAWd72k-ZUIbGyl8fWl2dIQT-MEmKcEHOxWd9kKGBC0d02STu16W9GIB8z4/s1600/1.jpg" title="This is featured post 1 title" alt="Replace This Text With Your Featured Post 1 Description." /></a></li> <li><a href="#"><img src="https://blogger.googleusercontent.com/img/b/R29vZ2xl/AVvXsEhaa1JlUFZltSDBC33BkH0sEhpL_WBcyfbCriG3AfXrgzH2at3Dcl0ziq7PK2py7vncLsAdPWjxzdQtepfePoOWfif3-HVUNGxEZ9-ioVpr0JBm8Q0vuMAc-4dIO1UN2YthY7bZmxBaHeg/s1600/2.jpg" title="This is featured post 2 title" alt="Replace This Text With Your Featured Post 2 Description." /></a></li> <li><a href="#"><img src="https://blogger.googleusercontent.com/img/b/R29vZ2xl/AVvXsEhgTTnnhd2pqgqDotzcFtnkIn6eLN_1JtGLCHRT7kGzM0EkrBOU3etOAXAUDXWdEpH53KqG4ktLw7m24BxmftKfdyj0oYzMi8hCRM6i397iCOyKweu-xtEQ2kGPpWHC2DdFsyBEBR08A9U/s1600/3.jpg" title="This is featured post 3 title" alt="Replace This Text With Your Featured Post 3 Description." /></a></li> <li><a href="#"><img src="https://blogger.googleusercontent.com/img/b/R29vZ2xl/AVvXsEjCvee_bm1lJN1ZqGN9Xz_1QTSQeniisz1OspdmJEkRe7IsYryg7n26ugcG8yewAXlEG5PrYsNs8-_UVMOMSswi6-B6OxSEehu_bf6u83Z8o3Mj-T2dYCrEl96QK7islnZ93En7Ko4XlIo/s1600/4.jpg" title="This is featured post 4 title" alt="Replace This Text With Your Featured Post 4 Description." /></a></li> </ul>


You can add more slides as you like.


Note : Replace images URLs,"This is featured post X title","Replace This Text With Your Featured Post X Description" with your content.


You are done.

Simple Stylish JQuery Image Slideshow For Blogger


Remember Always Back Up Your Template Before You Make Changes - How To Back Up A Blogger Template 

Step 1. In Your (New Design) Blogger Dashboard Click The Drop Down Menu For Your Blog > Choose Template > Then Edit Html > Now Proceed as shown in the video Below :

Step 2. Find the following piece of code in your blogs Html : (Click Ctrl and F for a search bar to help find the code - How To Find Code In Blogger Template Template) 


]]></b:skin>
Step 3. Copy and Paste the following code Directly Above / Before ]]></b:skin>


/* Start Slider Code From http://www.spiceupyourblog.com/ */

ul.bjqs{position:relative; list-style:none;padding:0;margin:0;overflow:hidden; display:none;}
li.bjqs-slide{display:none;position:absolute;}

ul.bjqs-controls{list-style:none;margin:0;padding:0;z-index:9999;max-width:100%;}

ol.bjqs-markers{list-style:none;margin:0;padding:0;z-index:9999;}
ol.bjqs-markers li{float:left;}

p.bjqs-caption{display:block;max-width:96%;margin:0;padding:2%;position:absolute;bottom:0;background:rgba(0,0,0,0.7);color:#fff;-moz-border-radius: 6px;-webkit-border-radius: 6px;-moz-box-shadow: 4px 4px 4px #dddddd;-webkit-box-shadow: 4px 4px 4px #dddddd;}

}
/* End Slider Code From http://www.spiceupyourblog.com/ */
Step 4. Find the following piece of code in your blogs Html : (Click Ctrl and F for a search bar to help find the code - How To Find Code In Blogger Template Template) 


</head>
Step 5. Now Copy And Paste This Code Directly Above / Before </head>


<!-- Start Slider Code From http://www.spiceupyourblog.com/ -->

<script src='http://code.jquery.com/jquery-1.6.1.min.js' type='text/javascript'/><script src='http://yourjavascript.com/9921010228/basic-jquery-slider.min.js' type='text/javascript'/>
<script type='text/javascript'>
$(document).ready(function(){
$(&#39;#my-slideshow&#39;).bjqs({

&#39;width&#39; : 940,
&#39;height&#39; : 340,&#39;showMarkers&#39; : true,
&#39;showControls&#39; : true,
&#39;centerMarkers&#39; : false
});
});
</script>
<!-- End Slider Code From http://www.spiceupyourblog.com/ -->
Important - The line of code in yellow is the jQuery script, if you previously added jQuery to your template leave it out.

Remove The Next/Prev And Number Controls - You have the option to remove the next/prev buttons, Number buttons or both.In the code above '&#39;showMarkers&#39; : true,' change to false to remove the number buttons.Change &#39;showControls&#39; : true, to false to turn off the next/prev.On the next line you can see th option to center the numbers.

The two lines in red and the width and height.The width is currently 940px and the height is 340px change them as needed.Remember your images will need to be the same size as the width and height you choose here.

Step 6. Save your template.

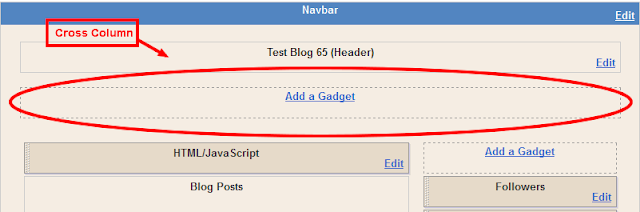
That's the Css and Scripts added now you need to add the html.To have the slider span across your full blog as in the demo you need a gadget area called Cross Column and can be seen in the image below.If your blog does not have this section available you can see how to enable it here - Add Full Width Cross Column Gadgets To Blogger.


Adding HTML For The Slides


The HTML for the slides goes in a Html/Javascript gadget in the cross column section as shown above.

Below is the html for the slider in the demo.There is no really easy way to explain it so you will need to take a minute to figure out the code.I have the the image URLs is in green and the caption (Optional) is in yellow.Each slide works in the same way, you can just copy and paste this code and replace the Image URL and captions.To add extra slides you can repeat one of the sections and once again add your URL, Image and Caption.


<div id="my-slideshow">
<ul class="bjqs">
<li><img title="This is a caption." src="https://blogger.googleusercontent.com/img/b/R29vZ2xl/AVvXsEgDBaS7aHrKhZ4geKx6KmPf0FQp5_23mPonZceDEJjFhhQa7xnTggq8QAnUcfhY6ya5b-TrX67r1yeTlHgO8MSi5izhFO7ZbtIc2F4HDPGRx4vFbDl6iW1ZxVvX9eR2Y7qRZsMigSdK9FA6/s1600/slider-image1.jpg"/></li>

<li><img title="This is a another caption." src="https://blogger.googleusercontent.com/img/b/R29vZ2xl/AVvXsEhts5LcZ8JqzbDuzJRQ-RgjzBR7QmAHomiCSUxCxV78jY3Y20yUHv0cxeq4_BTfM1dsbs04AsLxh59ZVGL0iB12npCSqw3m74oo6p_NuUA7Jy3dMXIJHn2_zzGmcS3dMP5iE5YXrhSzhgN8/s1600/slider-image2.jpg"/></li>

<li><img title="This is a another longer caption." src="https://blogger.googleusercontent.com/img/b/R29vZ2xl/AVvXsEhLEMvxLoHXNF3IJ7ohstynncLpzu8pa0FzK3apZm-gSITYZjcydLhjtCHt-18MjvaIStvZqlk-bAHvIaLzVDOeLbZ0Th0kKPP4iu_Mo8W-akeL0KD4ibRHnpamrWOBjk8ZQRgWbv4lUiE-/s1600/slider-image-3.jpg"/></li>

<li><img title="This is a another much longer caption." src="https://blogger.googleusercontent.com/img/b/R29vZ2xl/AVvXsEgMBv3KZYpVkxT8jKqK-HcgqEFqkBe9lvd9JJHFKf3vh5xRClckYc-LcjKjj6wpZb8qEqcMVozgsrpvqSgADcrx7PMJl13y58VB0YHu0yOGrFw4AkmKIWgqK76E2U2uJ23F_yvr99fsmpg_/s1600/slider-image4.jpg"/></li>

<li><img title="This is a another longer caption that can be the lenght of the image or even longer onto the next line." src="https://blogger.googleusercontent.com/img/b/R29vZ2xl/AVvXsEjiB7JF4ZyqR2Zo3L1hszVhHj-E2kHt-tGv5Zn9u6OexolGXqhAJZMlmEL-ENYj5WF8bW4djdEDmE0V40qvpDe2pXK9Slm4ZEv4SKJMk1lsC1sTQuEq-cMP-sVJtHh_WAuVh5Kdu9NR5u5F/s1600/slider-image5.jpg"/></li>
</ul>
</div>
That's it, a bit of work needed hopefully you could follow it and have a great looking jQuery Image Slideshow.You can find more Featured Sliders In Our jQuery Posts.
Related Posts Plugin for WordPress, Blogger...

Subscribe Updates, Its FREE!